Friday, October 26, 2012
The Return...
Well here it is.... my long awaited and much anticipated return to blogging...almost. It's been too long to contemplate since my last update. (Only one year, 5 months, 29 days and 11 hours but who's counting). Many things have changed in my life during that time, except for my utter love of all things nail polish! And that's why I'm back. I'll share my life changes here and there over the course of what I hope are many, many future blog posts but suffice it to say all has been for the best. I have a new home base, a new man in my life, lost 50lbs and (nearly) best of all I finally got a new laptop. I know, it's the little things in life, isn't it? So while I work on reformatting the blog's look, learn how in the heck to create a watermark for my photos and attempt desperately to comb thru the monstrous back log of mani photos I wanted to let anyone who may still be checking in on me from time to time (and bless your heart if you are!) that I'm still here. Just as I did the first time I'll start posting photos of the past years NOTD's and we'll work our way from there. So stay tuned my polished friends, the future looks bright and sparkly!
Tuesday, April 26, 2011
Chez-Delaney Plates D23 & D25
For my very first reader request (yay!) below are the Chez-Delaney Plates D23 and D25. As before all images are swatched with Wet N' Wild Black Creme.

Above is plate D23. All of the images came out pretty nicely, even the fine lines of The Beatles image, the Playboy bunny and the cartouche. Sorry for the larger pattern images being a little wavy :}

Above is image plate D25. This plate didn't fair as well as D23. I had quite a bit of trouble getting these images to transfer. The Batman image has such a large surface area that it tends to bleed, I would recommend using as little polish as possible and waiting a few seconds in between scraping the excess polish and applying the stamper to the IP. I also had trouble with the Ghostbuster image which doesn't show the actual image of the ghost just the outline of the circle with the cross piece. I'm pretty bummed about that one, I was really looking forward to a Ghostbusters mani. Lastly what should have been the Dharma Initiative image (2nd row, 4th from the left) didn't come out at all. I tried 5 times and could only get the center of the image to transfer. So I appologize to the reader who requested it. On the positive side the V for Vendeta and the Thundercats image came out perfectly!
So there you have it! Thanks again for the request :) I also have a small piece of news to share ...... (wait for it) ...... the better half and I are buying our first home! It's been in the works for the past month and we are finally nearing the end of the buying process. So the next few weeks we'll be packing (lame), cleaning (blech) and then moving lots of heavy boxes (ouch!). I don't expect to be able to post regularly until were in the new house so please forgive my breif hiatus again. I'll have plenty of NOTD's to catch-up with and I'll have my very own art studio so I can get back to the Chez-Delaney image plate swatching. Talk to you again soon!
Followers? What are those?!?!?!
Just a super quick post to say THANK YOU! to my 4 followers :) In all honestly I stopped posting because I just figured no one is reading this garbage. Then low and behold I find a little comment about my blog on MUA! This has so made my week. So again thanks for reading and I apologize for my absence. I have tons more Chez Delaney plates to swatch so I'll try to get some more of those up soon. Along with a bunch of NOTD's that I have sitting on my iPhone. Love, Peace and Chicken Grease!
Sunday, February 27, 2011
Backlog of Old Mani's!
Howdy Y'all!
In my first introductory post I said I would be putting up some photos of past mani's and I have finally corralled them all together and am ready to let you take a look. Its a bit of a mash up of looks I had done at my local nail salon (if you in the Seattle area and looking for a good place to go contact me and I can give you their information) and some are looks I've created myself. I'll denote whom they were created by and if I have done them I'll also list the polishes and/or Konad/Bundle Monster plates I have used. *PLEASE NOTE* There are like a bazillion photos so you are officially forewarned :) So here they are in order of oldest to newest..... enjoy!
P.S. I'm still working on swatches of the new Chez-Delaney image plates and hope to have more of those up in a few days. Thanks for your patience :P


Well I hope you enjoyed my little trip down memory lane. I know that was a suuuuper long post, so give yourself a little pat on the back for making it this far ;) Next post will be of remaining Chez-Delaney image plate swatched. So stay tuned - same bat time - same bat channel!
In my first introductory post I said I would be putting up some photos of past mani's and I have finally corralled them all together and am ready to let you take a look. Its a bit of a mash up of looks I had done at my local nail salon (if you in the Seattle area and looking for a good place to go contact me and I can give you their information) and some are looks I've created myself. I'll denote whom they were created by and if I have done them I'll also list the polishes and/or Konad/Bundle Monster plates I have used. *PLEASE NOTE* There are like a bazillion photos so you are officially forewarned :) So here they are in order of oldest to newest..... enjoy!
P.S. I'm still working on swatches of the new Chez-Delaney image plates and hope to have more of those up in a few days. Thanks for your patience :P

3/20/09
This look was created at the nail salon using white tips and acrylic. First the tips were applied then 3 femo fruits were placed directly over the tips and my natural nail then everything was covered with clear acrylic. This is the look that started it all! I LOVED this design so much that I though I should start taking pictures of my nails so I could keep track of what I had done. Little did I know nearly two years later my nail obsession would snowball itself into this little blog :)

7/16/09
This look was also created using acrylic. Just the basic white tip mani with a few jewels glued on and some blue stripes added.

8/5/09
This was a simple new acrylic set covered with a coral polish then yellow and white stripes and dots were added.

8/13/09
Again a simple look, just an overall royal blue polish with white stripes and dots.

9/9/09
This acrylic set was the first time I had tried colored acrylic overlay. It's a bit more costly and much more time consuming to apply but the end result is *as you can see* very pretty. First a clear tip is added to my natural nail then the pink/magenta acrylic was added on top of the tips. To get the crisp "smile line" a cutting tool is used to remove excess pink acrylic that overlays the nail bed. The tool looks a bit like an acrylic nail tip but its made of metal with a sharp edge. It's pushed down and through the still soft pink acrylic and cuts away any extra material that would prevent a defined edge along the nail bed. Then another layer of clear acrylic is applied to the nail bed and a thin coating over the pink tips. Finally as per usual the entire nail is filed and buffed. If a light color of acrylic is used on the tips, as was done here you can hold your hand up to light and see through the nail tip. As my nail technician would say "Very Foncy, Very Foncy!" meaning very fancy, lol ;) . I then had some purple lines and dots added just to take it over the top.

10/7/09
This acrylic look was also created using the colored acrylic overlay technique I explained above. But this time 2 colors were used to create the colored tips, a bright red with sparkles and a white. After the nails were completed red and white hearts were applied and a silver sparkle line added. This look was very fun and reminded me of a deck of cards.

11/24/09
Another acrylic colored overlay. This time done with white acrylic mixed with large chunky iridescent glitter. Then a hand painted purple orchid was painted to the ring and thumb fingers. If you would like to try adding glitter or sparkle to your colored acrylic overlay I would suggest using a fine glitter piece. These were quite large and even after filing and buffing the nail still felt bumpy, much like a chunky glitter nail polish will feel.

12/2/09
Here again we have a colored acrylic overlay. This time done in a bubblegum pink tip with dark pink painted design and clear crystals added at the corner of each tip.

1/13/10
This acrylic look was also done using the colored acrylic overlay method but with 3-D acrylic flowers added on top. This was the first time I had a 3-D design done to my nails and I really loved it. Each petal, dot or stem is created using a small nail brush to pick up the acrylic powder then its *very carefully* placed on the nail and shaped with the brush. As you can imagine its quite laborious and consequently expensive. This full set was about $50 and took around 3 hours to apply. But everywhere I went for the next 2 weeks I constantly got compliments on this mani, which a girl always enjoys ;)

2/21/10
The acrylic 2 color overlay had then become my go-to look, with an added 3-D acrylic flower. This nautical-ish look was created with dark blue sparkly and white acrylic. What I have yet to mention about this method is the dreaded grow-out... dun, dun, DUNNNN! Unlike the regular white tip with clear acrylic method using dark colors like this one looks very obvious once the grow out occurs. You simply cant get a fill and have the tips repositioned closer to the cuticle. You also cant just file off the dark color, you have to either deal with the grown out look or cover it with a darker polish. So keep this in mind when choosing tip colors.

3/15/10
As mentioned above the grow out for dark color acrylic overlay is a real pain. So I thought I'd be clever and have a new acrylic set applied but used the normal clear tip and clear acrylic. Then I had the colored tip painted on instead of using colored acrylic powder. It was pretty but just doesn't have that same pop. Although on the up side once its time for a fill you can just repaint the tips and your look is like new again.

3/26/10
This simple look was done by my nail technician after an acrylic fill and I just had a light purple base polish applied with darker purple and silver lines added. The lines are in varying thicknesses and weren't really to my liking.

4/6/10
I painted this mani over the preceding purple and silver design. These colors are Wet N' Wild 451B which is a nice blood red creme. The dots were created with tip of a ball point pen (I had yet to buy any real nail art supplies like a dotting tool, lol :) and Wet N' Wild white creme.

4/16/10
This is most definitely one of my all time favorite acrylic sets. It was created using clear tips and light blue colored acrylic powder covering those tips. Then small iridescent flakies were layed down on the nail bed and on top of the light blue cured acrylic then covered with another layer of clear acrylic. Then I had little femo sawhorse's applied and little white bubbles added. The light blue length of the nail wasn't opaque and was just like shimmering water, fab!

5/14/10
This acrylic set was inspired by the Decoden style of nails I was interested in at the time. The base was a green leaning turquoise then 3-D acrylic flowers and dots were added. It makes for quite a thick nail but as the flowers are made entirely out of acrylic they are very durable. If I remember correctly I had this design of for 3 weeks and didn't loose 1 flower.

8/18/10
This design was your average pink and white acrylic set and because I was going to Disney Land for the first time since I was a kid I had the nail artist add small pink Mickey Mouse heads, an understated look for me but pretty none the less.

9/12/10
This painted design was done at my nail salon to cover up the grow out from the Mickey mani. The background color was a mid-toned purple with light blue, pink and white flowers with silver sparkle centers. Not my favorite look honestly bu they all can't be winners, right?

9/19/10
This was my very fist experimentation with water marbling. The look was created using Orly Rage a rosy copper metallic, Orly Shine a metallic silver, Orly Opal Hope a light pink with a faint green shimmer and lastly with one of my favorite polishes China Glaze Strawberry Fields a nice bright pink with gold glass flecks. I forget which blog I first saw water marbling on but as soon as I did I knew I had to give it a go.

9/25/10
This was a second (pretty much failed) attempt at water marbling. I obviously hadn't perfected my technique yet and didn't fully understand that some polishes just don't work well for this medium. This look was created using Orly Shine a silver metallic, Hot Topic 237684 which is a thick dark purple with a faint sparkle, an old Tropez polish with no name which is the bright blue and an old, old, old Pro 10 polish called 1000 Watt a blinding bright pink. The combination of these colors just wouldn't separate in my water cup and kept clumping up. I think I re-did each nail 2 or 3 times and finally settled on this end result. Moving on....

10/6/10
This was my first and so far only attempt at a sponged gradient. The base color is Barielle CoCo Bar a beautiful dark chocolate and China Glaze Midnight Kiss a gold metallic. I didn't stipple on the gold quickly enough and ended up with a very textured look that looked a bit more like Cheetos dust on my tips then what I had originally envisioned, but it was a good learning experience.

10/11/10
This was my 4th and finally successful attempt at water marbling. This look is in my top ten of all time fave mani's! I finally learned the secret of using room temperature bottled water and a clean orange stick to swirl my colors. This was created using Piggy Polish Damsel in this Dress a bright metallic-ish orange, N.Y.C. Taxi Yellow Creme which is as described with a hint of light yellow shimmer, Orly Red Carpet a beautifully red creme with red glass flecks and Olry Royal Navy a dark blue with teal hidden shimmer. These combo of colors were SO vibrant I really couldn't take my eyes off my nails. I think I wore the look for a week and a half, which is like a month the "regular person" time, hehe :)

10/11/10
Another pic of the beautifulness that was water marble #4!

10/21/10
This was a quickie experiment using my then newly acquired China Glaze OMG collection. Each nail is covered in half by China Glaze OMG the beautifully reflective silver holo and on the index finger China Glaze TMI a medium pink holo, on the middle finger China Glaze 2 Nite a blurple holo, on the ring finger China Glaze DV8 a magical teal holo, on the pinkie China Glaze IDK a light purple holo and finally on the thumb China Glaze L8R G8R a bright yellowish-green holo. My acrylic set underneath was quite grown out at the time but I just had to test out the colors along with my also newly purchased dotting tool. *Note to anyone looking to buy the L8R G8R polish (if you can still find it that is) it stains like a mother! I had this on for a few days and my thumb nail was green for a week afterward, even with 100% acetone removal.

10/21/10
Another shot of the blingieness of the OMG collection.

10/31/10
This much more wearable look was also created with the China Glaze OMG collection. Half of each nail was painted with TMI and IDK with little dots of DV8 to add some depth. Then the DV8 dots were covered with just a touch of Milani Diamond Dazzle, a mega-bling fest sparkle top coat. Then a quick coat of Seche Vite Fast Dry top coat.

10/31/10
These little monsters we inspired by Deez Nailz
and was created using Essie Pretty Edgy for the green background and Wet N' Wild Black Creme. I do like how they came out but I was in a bit of a rush to finish them as it was already Halloween night and I wanted to have them done before the trick-or-treaters showed up at out house.

11/3/10
This look was created on top of a fresh set of acrylic nails which were painted with a base coat of OPI She's Golden at my local nail salon. The design I painted was inspired by this look by The Daily Nail but I wanted to switch it up a bit to look more like gumballs rather than sprinkles. So here is my "Gumball" mani! For the different colored gumballs I used Wet N' Wild a white creme, N.Y.C. Taxi Yellow Creme, Orly Cotton Candy for the light pink, Wet N' Wild 451B for the red, an old Hard Candy called Mint for the light green, Essie Pretty Edgy for the dark green, OPI What's with the Cattitude? for the light blue, L.A. Girl Funkadelic for the darker blue, Essie Lilacism for the light purple and finally L.A. Girl Hustle for the dark purple.

11/3/10
Another look at the "Gumball" mani.

11/11/10
This epic fail of a look was pathetically created using several coats of Seche base coat to *try* and fill in the growth gap from my last acrylic fill. The base color was Essie Lilacism, the freehand tips were done with a very gloppy coat of China Glaze Electric Lilac and an uneven and also gloppy line of Hot Topic 237684 a dark purple. At this time I had yet to try using a polish thinner to fix my old gloppy polishes. I have since purchased a bottle of SuperNail Nail Polish Thinner from HEAD2TOEBEAUTY.com for $3 and it has really worked wonders for all of my troublesome thick polishes, I would recommend it if your looking for a decently price thinner.

11/15/10
This was my very 1st attempt at Konad! By this time i was creating more and more of my own looks and had recently read about Konad. While I thought the plates were pretty expensive (at about $5-6 a piece) I ordered a few from Amazon. I stole this look from another blogger, but can't for the life of me remember who. So if this was your look I apologize for not crediting you! I really wanted to recreate it for my fist Konad attempt. I was so pleased with myself I look like a thousand bad cell phone pics of this mani. This photo was the best of the bunch but please still excuse the lameness of my old iPhone camera, the iPhone 4's camera is leaps and bounds better than the old iPhone 3G. Anywho this look was created using Sinful Colors Petal as a base, then a large red dot was added with Wen N' Wild 451B a red creme. Then I applied the netting design from Konad image plate m57 with Wet N' Wild Black Creme, next the flower image was applied from Konad image plate m64 with China Glaze Snow, a white creme. Lastly the pink chunky glitter China Glaze Glam was added to the corners. For my first Konad attempt it was pretty impressive :D
*****WARNING UGLY TOES AHEAD! I REPEAT, WARNING UGLY TOES AHEAD!*****

11/15/10
I was so happy with my first Konad-icure I had to try a Toe-nad-icure! This is base color OPI What's with the Cattitude?, a light blue creme with L.A. Girl Funkadelic, a medium blue creme applied with Konad leopard design on image pate m57. P.S. Sorry my feet are so ugly, I promise not to post any more pics of them ever again, lest you have nightmares about their alien like freakishness.

11/22/10
This "Vegas Baby!" themed mani was my second foray into the world of Konad. As you've probably read in my blog intro I am originally from Las Vegas and my mother and other relatives still call it home. I was lucky enough to spend this past Thanksgiving at my mom's house and wanted to do an over-the-top blingie mani for the occasion. I'll start with the thumb which has a base coat of China Glaze Snow, a white creme with the "Bar" symbol from Konad IP m48 stamped with Wet N' Wild 451B a red creme, Wet N' Wild black creme, Orly Shine a metallic silver (which you can't really see) and Orly Snowcone a periwinkle blue creme. Then everything was topped off with Milani Diamond Dazzle a sparkle top coat. For the index finger I used Orly Shine as the base coat, then stamped the cherries from Konad IP m48 with Orly Red Carpet for the red in the cherries and Essie Pretty Edgy for the green in the stems. I then applied some little red dollar store crystals on top of each cherry. For the middle nail I used Wet N' Wild 451B for the base and China Glaze Snow for the background of the cards stamped with Wet N' Wild black creme for the outline of the hand of cards, again from Konad IP m48. For the ring finger I again used China Glaze Snow for the white background and stamped the poker chip from Konad IP m48 with Essie Pretty Edgy for the darker green, and old Hard Candy color called Mint for the light green and Orly Snowcone for the blue. Then all was covered with a coat of Wet N' Wild Kaleidoscope a chunky glitter topcoat. Finally for the pinkie nail I used China Glaze Midnight Kiss a metallic gold for the background and Wet N' Wild black creme for the "777" from Konad IP m48, then added more dollar store gems to the corner tip of the nail. This was a really fun look to create. I really, really wish I had a better photo of this because it was the bees knees in person.

11/22/10
Another (still blurry) photo of the "Vegas Baby!" mani.

12/3/10
Here's a little scratch that, a lot of back story on this mani: It was the best of times, it was the worst of times... no wait that's not right. Oh ya this is how it went; it was early November 2010 and I was sitting on my sofa at home on my lunch break..... Do you ever see a polish online or in a sale flyer and think "I *MUST* have that polish!"? That's exactly how I felt when I first saw China Glaze Party Hearty in my Ulta sale flyer. I called the nearest Ulta after seeing the sale flyer to see if they had the China Glaze 2011 holiday collection including the now coveted Party Hearty. And to my surprise they did! I hauled tail down there not 2 hours after I spoke with the sales girl and low and behold the entire collection had already been picked over. Wah, wah, waaa :( Needless to say I was mega disappointed. So I picked up Drummer Boy a dark navy with light blue shimmer and Midnight Kiss a gold foil and an Ulta brand polish called Into the Limelight a extra foil-ie light green. Then I dawned on me... maybe I could hit up the other Ulta in my area. Hey it was only 20 miles (each way) away, that's a small price to pay to the Nail Polish Gods, right? So I called them up but they didn't have any left. But devilishly the sales girl said "...but maybe we still have one in a holiday gift set?". So I asked "Could you check for me?". "No, I'm so sorry its late Friday afternoon and were super busy" was her lame reply. So I hopped into the Rabbit and headed north.... only to find the gift sets had also been emptied of their Party Hearty's. Of course I couldn't leave empty handed so I picked up Jolly Holly a frosty forest green shimmer. Still dejected and pouting I headed home. I figured I'd stop by my local Sally's Beauty Supply to see if they had anything interesting, since I knew by now the illusive Party Hearty was never to be mine. As I walked in the door what did my wondering eyes did I see but 8 little polishes waiting right there for me!!! I didn't want to be greedy so I decided to buy the gift set with Party Hearty and Mrs. Clause a sheer red with red glitter in it and Snow a white creme. Now I had all the makins of a fab Xmas mani. Fast forward to the beginning of December and I finally got to try out my wonderful Party Hearty. On the thumb I have a base coat of Jolly Holly, on the index, middle and pinkie I have a base coat of Into the Limelight and on the ring finger a base coat of Wet N' Wild 451B. Then all fingers topped off with a "hearty" dose of Party Hearty! I couldn't be happier with how it turned out. Sometimes you just need a little perseverance to attain that must have polish.
The End.
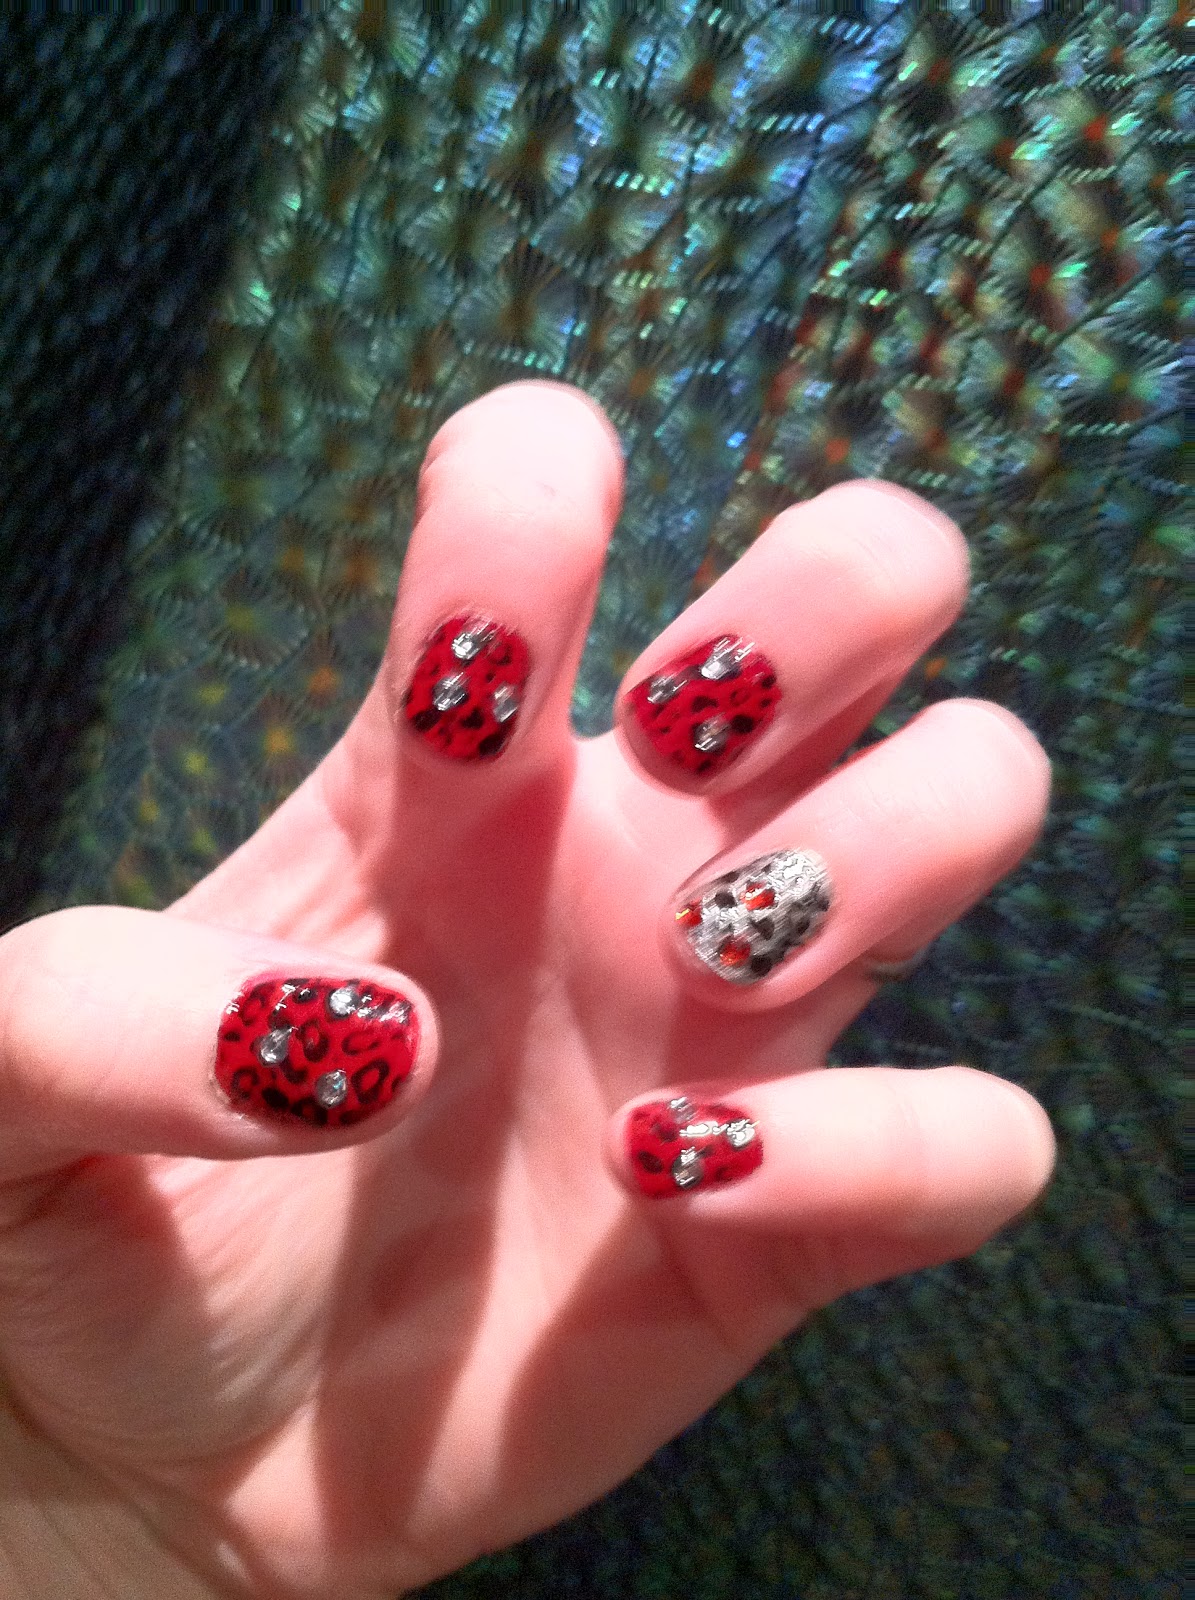
12/31/10
I created this look for New Years 2010. I apologize for the blurry picture, as is customary on New Years I had already imbibed a few drinks before it came to me that I should take a pic of my nails, lol ;) All but the ring finger have a base coat of Wet N' Wild 451B a red creme stamped with Wet N' Wild black creme as the leopard design from Konad IP m57 and clear dollar store crystals applied randomly to the leopard spots. The ring finger has a base coat of Orly Shine with the WN'W black creme and the same leopard spots and red crystals. I'll definitely be trying the look again, so vampy! P.S. check out the awesome wall paper behind my hand! It was shimmery green and purple and it totally reminded me of a peacock feathers. Wish I hadn't been so tipsy and remembered to take a better photo of it. I want that on my walls someday.

1/12/11
This mani was a little experiment. I hadn't had any false nails for a little over a month and it was driving my crazy so I decided to try out some (for lack of a better word) press-on nails. They weren't an entire nail just the tips which were glued to the tip of my natural nail. They weren't very strong and I had a visible line where my nail stopped and the false tip started. But again it was just an experiment. The base cost was an extra old Hot Topic polish with no name, its a dark purple with sparkle topped with Bundle Monster IP BM20 using Ulta Into the Limelight. I really like the juxtaposition of the light green and dark purple.

1/17/11
First of all please let me explain about the awful state of these nails. The false tips I had applied a week ago were still on but the raised edge of the false tip was driving me crazy. So I decided to file the tips a bit to try and blend them with my nail bed. Well obviously that didn't work very well. It made the tips very flimsy and they broke off unevenly. I figured since I'd now have to take them off I might as well do some more stamping experimenting. So here is the result. The base coat was OPI What's with the Cattitude?, then the white lattice pattern from Konad IP m57 was applied with China Glaze Snow, then the little swirly image from Bundle Monster IP BM02 was added with Orly Snowcone (unfortunately this element of the design isn't really visible in the design), next the lips image was added from Bundle Monster IP BM02 in Hot Topic no name dark purple. Next 2 or 3 coats of CND Sapphire Sparkle a blue/purple shimmer topcoat. Finally a few coast of China Glaze Glam pink a chunky glitter in the corners. It was a beast to remove all those layers but I very much liked the end result.

1/19/11
This look was a test run for a wedding mani I wanted to wear to a friends ceremony at the end of January. The base coat is 4!!! coats of Milani Angel Pink, it took forever to build up the opacity of this polish. Then it was stamped with Konad Special Polish in White with the flowers from Konad IP m35. Lastly topped with China Glaze Shooting Stars, which is a fine holographic sparkle mixed with larger chunky holo sparkle bits. A must have if you like sparkly topcoats.

1/19/11
Another shot of the prelim wedding mani.

1/25/11
This mani was inspired by these cute little Disney stickers I recently found at Uwajimaya, which is an Asian grocery store/food court/book store/housewares store in Seattle. The base coat for this mani was Nubar Prize a pink with multicolored holo sparkle . I then added a sticker to each nail and covered with 3 coats of Seche Vite Fast Dry top coat. Sadly this mani only lasted 1 day :( I painted them one evening and by the following day the stickers had almost all started to peel and every time I washed my hands a little bit more would come up/off.

1/25/11
My right hand of the Disney sticker mani.

1/31/11
This is the final version of the wedding mani. I really liked the neutral attempt I had done a few weeks ago but it didn't go with my dress. So the morning of the wedding I painted and Konaded up this design. The base color is China Glaze Phat Santa a red creme, with the netting design from Konad IP m57 using Wet N' Wild black creme, next I added the flowers from Bundle Monster IP BM12 stamped with China Glaze Snow then added a coat of China Glaze Treasure Chest a chunky gold glitter and finally added some dark blue rhinestones I purchased from DollarNailArt.com. I forgot to take a photo before the wedding and reception so this is the "day after" shot, hence the chip on my middle finger.
Well I hope you enjoyed my little trip down memory lane. I know that was a suuuuper long post, so give yourself a little pat on the back for making it this far ;) Next post will be of remaining Chez-Delaney image plate swatched. So stay tuned - same bat time - same bat channel!
Tuesday, February 8, 2011
Chez-Delaney Series D Swatches - Part 1
Below is the first installment of the Chez-Delaney Series D swatches! These are image plates D1 thru D8. All images were stamped with Wet N' Wild Black Creme on drawing notebook paper. I know the black isn't too interesting color wise to look at but I figured it would give the most contrast and detail to the images. I almost always do my swatching in the evening after work so all photos are taken indoors with artificial lighting. Please excuse the shininess of some of the images. I had a halogen lamp directly above me while photographing and it made some of the images a little glossy looking.

Chez-Delaney Series D, Image Plate D1
As you can see almost all of these images turned out pretty good. My favorite is the little wreath in the top right. The one image that gave me a bit of trouble is the 4th image from the left in the second row. It's supposed to be a reindeer but the engraving on the IP was so thin there wasn't much of a design to stamp.
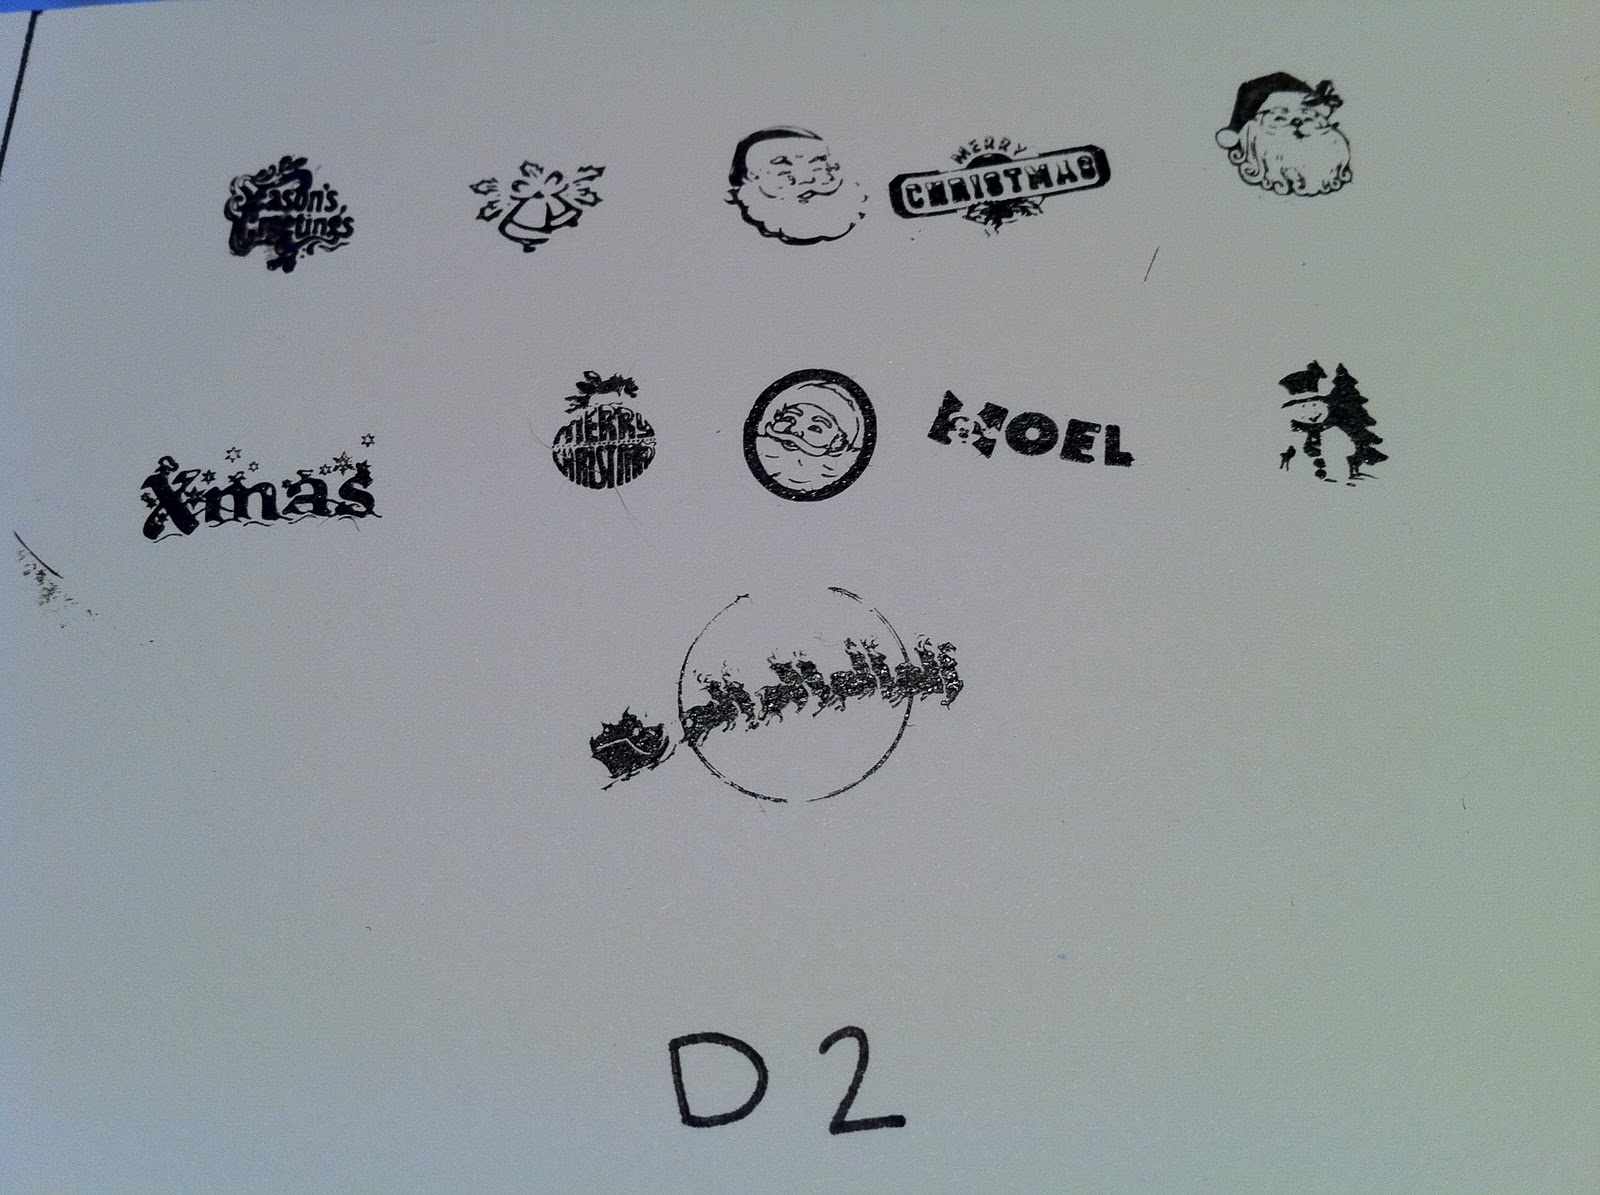
Chez-Delaney Series D, Image Plate D2
This IP also came out well. My fav is the "Xmas" in the snow with what looks like little snowflakes in the background, it's a pretty detailed image but still came out nice and crisp. The most difficult was the 1st image on the top left, the "Seasons Greetings". For some reason the S and G kept bleeding together and getting smudged :(

Chez-Delaney Series D, Image Plate D3
This is a nice little Halloween themed IP. I really like the little Jack Skellington head (3rd image from the left, top row). All of these images came out fine. The "Halloween" word on the bottom row smudged but I think that's because I had a little polish remover on the end of my stamper. You can also see how the witch and skull on the far right look metalic. That's the halogen light messing with the black creme polish. It makes them a little hard to discern but they both look fine IRL.

Chez-Delaney Series D, Image Plate D4
This is another Halloween plate. The Jack Skellington image in this plate (2nd image from the left, 2nd row) didn't turn out as well as on D3. The spiderweb in the background was pretty faint. My fav image on this IP is the little cat with the raised back, Meow!

Chez-Delaney Series D, Image Plate D5
This image plate was very easy to use and all of the images turned out nice. I love bows and this IP didn't disappoint!

Chez-Delaney Series D, Image Plate D6
More bows, woohoo *lol* Although these were a bit more bothersome to work with. The 3rd bow from the left, top row wouldn't stamp completely in the edges and the same with the largest bow on the bottom row. But overall I really like this IP. Love the little flame thing (top left) it would look kool stamped multiple times with different colors to create a flame/fire effect (will have to remember to try this out as a nail design). But the piece de resistance for me was the heart with the little dots around it! I can see using this particular image over and over.

Chez-Delaney Series D, Image Plate D7
Again another Christmas themed IP. None of these images really "did it" for me and most turned out just ok, not great. With the one exception of the stylized snowflake on the far right, 2nd row. That one came out perfect first try.

Chez-Delaney Series D, Image Plate D8
YAY! This is the IP I was the most excited to try :D and every image turned out great. First up Madonna, classic 80's pose - cant go wrong there. Next Michael Jackson, love it! Then The King, Elvis. When I saw this image I knew I was totally gonna stamp him in green and do a "Zombie Elvis" look. Next up the classic Marilyn Monroe, flawless. Going to do a mani on the BFF with this stamp ASAP (she looooves Marilyn). And to round out the first row... Woody Allen? Well he's not really my kind of actor but he would make a funny mani. Moving along to Mic Jagger, I don't really like the Rolling Stones but he's an icon so I can see why he was included. This next one I just can't place. Is it a young Bruce Willis? Maybe Robbie Williams? Or possibly Matt Damon? I'm really not sure, so your guess is as good as mine. Next Che Guevara, as Wiki calls him a "revered and reviled historical figure". I read a bit about him upon seeing this IP but didn't delve too deep, as I'm an art lover not a history buff. Next another MJ image, I'd like to pair this with a piano key and music note Bundle Monster IP I have somewhere. It reminds me of the Bille Jean music video. Then Lady Liberty, this would be perfect for an New York mani. Which would be awesome if I was attending New York Fashion Week this week but alas I'm not that connected. But maybe I'll do a mani in honor of it anyway :) Lastly is another, slightly lamer MJ image. The idea is clever but when I see those type of ribbons I think cancer or something not MJ. So I prob won't be using that one too ofter. But really all in all an awesome IP!
So that's it for D1 thru D8. I'll be doing more stamping this evening after work and will be posting them later this week so stay tuned...
Subscribe to:
Posts (Atom)